Like all the Best 4X Mobile Strategy Games, Whiteout Survival has a huge amount of complexity. It can easily see new players in the game making big mistakes early on and stifling their long-term progress. Here, we outline some of the most important tips that beginners to Whiteout Survival should know to ensure they do not fall foul to any of these early mistakes. Indeed, even as a F2P player, with these tips, you could become a powerful player in your State.
Table of Contents
Join a Top Alliance

The player base in a new State is extremely fluid with huge numbers quitting the State every day. Indeed, it will easily take several weeks before the situation stabilizes and this can really harm you in the early game if you join a small Alliance that quickly dies in activity. By staying in an inactive alliance you will miss out on the wisdom of more experienced players, see far fewer rallies that you can join, miss out on ranking well in alliance events, and much more!
As such, you should look to join one of the top 5 Alliances and even consider switching to higher ones if the opportunity arises. Sometimes they will have requirements such as minimum power and furnace level, but if you are active, these should not be a problem. Alternatively, reaching out directly to the leader can be helpful for getting accepted. To see the top alliances, click on your profile picture, then select the Leaderboard button, and then finally select the Alliance Power option. This will display a full list of all alliances in the State ranked from highest power to lowest.
Focus on your Furnace
Your Furnace is by far the most important building in your city. Not only does it keep your city warmer the higher it is, but it also determines the level cap of all other buildings in your city. Therefore, to get higher-level Troops, you will first need to upgrade your Furnace which will allow you to upgrade your troop buildings. In addition, a higher Furnace level also unlocks more buildings that you may not yet have unlocked, be that the Command Center that increases your rally size, or your Research Center that is used to research new buffs, all these will be important to unlock as quickly as possible.
Keep Your Survivors Comfy, Happy, and Healthy
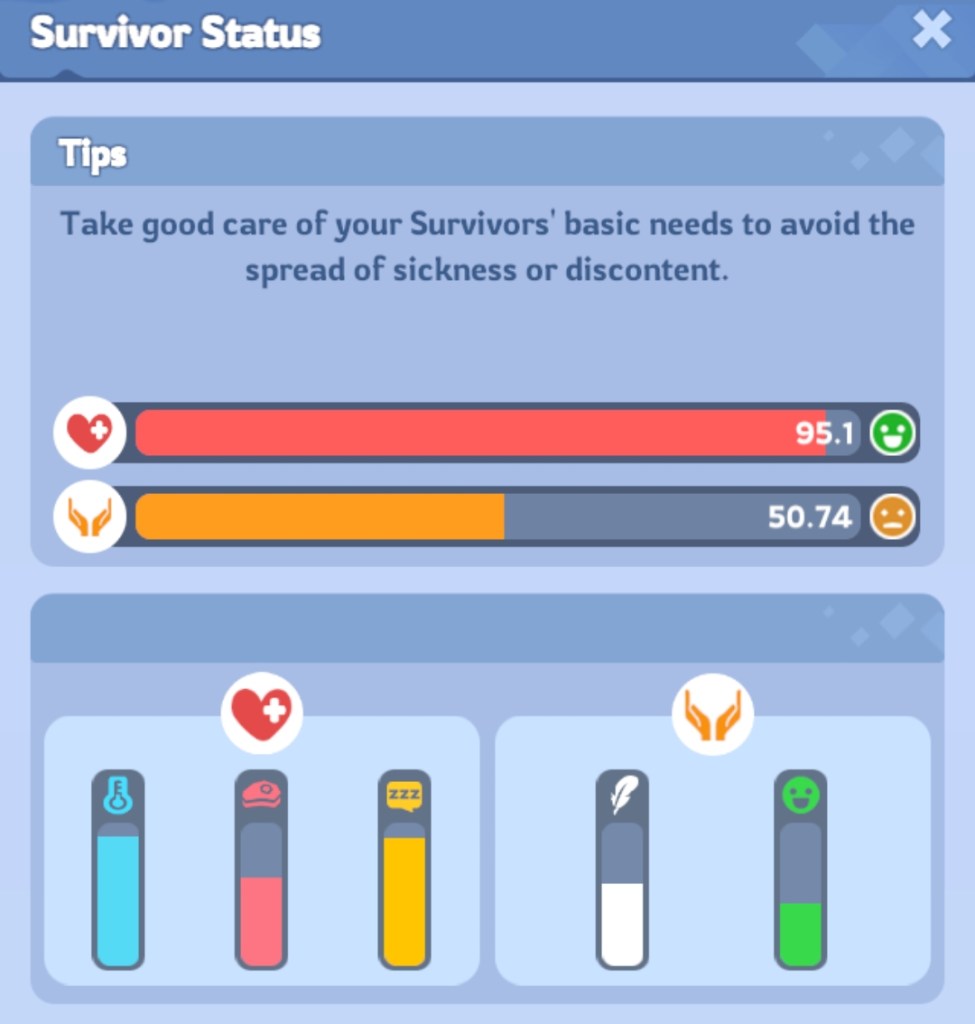
Early on in Whiteout Survival, it is not too uncommon to find yourself with unhappy survivors leaving your city or perhaps even dying. If this problem is not resolved, you could quickly see your buildings without the number of survivors required to operate them, bringing your progress to a complete halt. Below are a few things you can do to ensure this does not become a pervasive issue:
- Keep their comfort up – certain upgrades in your buildings will increase the comfort level of your survivors thereby keeping them happy. This is represented by the small feather icon. If comfort is a problem in your city then make sure you focus on these upgrades.
- Keep them warm – a cold city leads to both unhappiness and illness. Keep your city warm by upgrading the Furnace building as well as building upgrades with the small thermometer icon.
- Improve their mood – like the others in this list, mood can also be improved with certain building upgrades. These are represented by a small green smiling face icon.
- Don’t let them get hungry – survivors need to eat, and if they don’t have enough they will get mad and also sick, a bad combo. Keep on top of this by first making sure you are producing enough food from your Hunters Hut and secondly by making sure your Cookhouse is upgraded to its max level of 10 so that Survivors are getting fed enough. It is also recommended to set the Cookhouse Menu to Fancy Meal at all times. This is done by selecting the Cookhouse, clicking on the Production icon, and then selecting the meal you want to serve.
- Make sure you can treat illness – regardless of what you do, it is highly likely that early in the game you will see several survivors get sick. Unfortunately, this will often lead to death if you are not healing them well enough. To improve your healing make sure you have a Clinic and fully upgrade it to its maximum level of 10.
Take Part in the Bear Hunt

The Bear Hunt is one of the first events you will experience upon joining a new State in Whiteout Survival, and ensuring you always participate in the first few weeks is a super important beginner’s tip. In this event, the Alliance leadership will set a time for it to commence with the event then lasting for 30 minutes. It sees alliance members rallying a bear at the Bear Trap with rewards then paid out based on individual and alliance damage. It is a great source of a huge amount of resources for just 30 minutes of activity. These resources will be vital for your early game progression.
Unlock Gina ASAP
Although not the most powerful Hero in the game, Gina has a pretty useful buff that reduces the stamina cost of attacking Beasts and Polar Terrors on the World Map. With her in the rally, you will reduce the stamina cost by 10%. This can be increased up to 20% if you max out her Endurance Training Skill. Gina shards are available by leading or joining rallies to defeat Berserk Cryptids during the Gina’s Revenge event.
Plan for Hall of Chiefs

The Hall of Chiefs is another event that you will experience a lot during your time in Whiteout Survival. It sees all players in your state competing for ranking across several stages of activities in return for rewards based on their final placing. It typically lasts for 5 days with each day representing a new stage with a new competition. You can look ahead to what the next stages will involve such as a stage for developing Heroes, one for Training Troops, and so on. Make sure you check out what is coming and stockpile your resources for these stages to gain the maximum number of points. Make use of our Troop Training Calculator to work out how many points you can earn by training troops during the event.
Complete the Beginner Quests
In a new State, following the Quests is a great way to earn some rewards to keep your progress going and also to just learn the game in a structured way if you are new to Whiteout Survival. It also ensures you don’t end up wasting resources on pointless things like low-level Troops, with the focus kept on getting the level of your buildings up.
Careful with Teleports
Teleport items are expensive to accumulate so try not to use them for pointless things such as getting nearer a Polar Terror or for PvP on enemies with low resources. In addition, make sure you are using all the shops to try and pick up lots of Advanced Teleporters at a good price. Check out our full guide on How to Teleport and Get Teleporters in Whiteout Survival for help on this topic along with some specific teleporting strategies you can implement.
Spending Money
Games like Whiteout Survival can be real money pits that use every Microtransaction Trick there is to suck you into spending more and more money. Indeed, if it wasn’t for one incredible purchase buff, the top of the list in our Whiteout Survival Tips for Beginners would probably be to avoid spending altogether. However, for just a small amount of money, you can unlock a second building slot, permanently. This is seriously worth it and will double your growth potential instantly.
Focus on VIP
Increasing your VIP Level is a great source of buffs such as increased squad slots at VIP 5 and improved construction times at VIP 4. Your VIP level is increased by accumulating VIP Points which can be done for free by simply logging in. However, this is a pretty arduous way of improving your VIP level and it is better to speed things up by buying them. To keep it free you can use Gems and the other in-game shops, alternatively, you can spend real money on packs that contain VIP Points.
Don’t Waste Arena Tokens

Another tip in this list of Whiteout Survival Tips for Beginners is not to waste your Arena Tokens. These are earned by taking part in the Arena and ranking well on a Daily and Seasonal basis. Although there are several tempting options to spend your Tokens on in the Arena Shop, you should only buy the Custom Mythic Hero Gear Chest. It may take a while to save up the required 12,000 tokens but it is well worth it. These are the best gear that will grant your Heroes huge buffs.
Set Squads
To make starting or joining rallies quicker you can set Squad lineups. To do this, select your Profile icon and then click on the Troops button before finally clicking on the Squads button at the bottom of the new menu. This opens up the squad selection menu. Here, you can select the Heroes you want to send along with the troops to join them. As you upgrade your VIP and your Furnace, more Squad slots will open up. When joining or starting an attack, you can quickly select the squad you want to send. This makes the process much faster and ensures you don’t miss rallies that fill up fast. It is a good idea to have a squad for the main attack types you participate in so you don’t send the wrong heroes or formations.
Upgrade Your Troops
The final tip in this list of Whiteout Survival Tips for Beginners is to upgrade your Troops. This opens up once you have your troop buildings upgraded to level 13 and allows you to upgrade your lower-level troops to the level of the maximum you can currently build. It is highly recommended to do this as the low-level troops are extremely weak and will fill up your hospital fast. This is bad news because as soon as your hospital is full, your troops will start to die, permanently.
Focus on the Right Heroes
Early on, a lot of new players make the mistake of developing all the Heroes they have. This is a big mistake that will waste resources such as Skill Manuals that you cannot get back. There are some Heroes that are better to focus on, such as Jessie for joining attack rallies and Sergey for defense whilst many of the Generation 1 Heroes are quickly made redundant as you progress into later Generations. Check out our list of the Best Heroes for F2P Players in Whiteout Survival for help with making the right choice in the early game and our Hero Guide better understand what makes a Hero good.
Auto Join Rallies
Make sure you always have Auto Join Rallies active when you’re offline. It can be useful to leave one march spare so that you always have one squad queueing to join. This accumulates a great deal of extra resources, Gems, Speedups, Hardened Alloys, and more over time whilst you are offline. Each time you turn this feature on, it will need to be refreshed at least every 8 hours for it to continue being active.
More Whiteout Survival Guides from OCG
- Tips for Beginners
- Best Heroes for F2P Players
- Hero Guide
- Exploration Hero Tier List
- Hero List
- Hall of Chiefs
- Best Formations for Exploration
- Fast Gathering
- Alliances
- Alliance Championship
- Daybreak Island
- Troops
- Fishing Tournament
- Expedition Hero Tier List
- Lucky Wheel
- Alliance Showdown
- Flame and Fangs
- How to Get Gems
- How to Increase Your VIP Level Fast
- PvP Tips for Beginners
- Gina’s Revenge
- Hot to Get and Use Teleports
- How to Win in Arena
- Bear Hunt
- Brothers in Arms
- Frostfire Mine
- Crazy Joe
- Beasts & Polar Terrors
- Troop Cost Calculator
- Treasure Hunter
- King of Icefield
- State of Power
- Tundra Trade Route
- Fortress Battles
Join our Community
If you found these Whiteout Survival Tips for Beginners useful, then join our community below to be kept up to date on any new Whiteout Survival Guides published along with other interesting posts from the website.