One of the big things that attracts players to the Best 4X MMO Games is the politics and the inevitable PvP that follows. As you’d expect, things are no different in Whiteout Survival! However, before you jump straight in, and watch your Troops disappear, it’s probably a good idea to check up on some Whiteout Survival PvP Tips for Beginners. Of course, learning on the job is a great way to figure things out, but keep reading our tips below to get a head start and perhaps make the learning curve a little less painful!
Table of Contents
Create Squads

As mentioned in our Whiteout Survival Tips for Beginners, creating squads is a vital tool to use when operating in all parts of the game. This includes events such as the Bear Hunt, but it is also an essential tactic to use in PvP. It is the process of creating set formations for your Troops and Heroes. You can then quickly select the squad you want to use when starting a rally as shown in the image above.
This is great for PvP as it allows you to quickly select the squad you want to send, which will often differ depending on the scenario, and avoids any poorly thought out and rushed formations being sent on a one-way mission. To create a squad, select your Profile icon and then click on the Troops button before finally clicking on the Squads button at the bottom of the new menu. You can increase the number of Squads you can save by Improving Your VIP Level.
Optimize Your Heroes
Before you even think about starting to get involved in PvP, it is important to have your Heroes upgraded as much as you can so as to get the most buffs possible out of them. Check out our Whiteout Survival Hero Guide for details on all the different ways you can upgrade them, from leveling skills to upgrading star levels through ascending, and much more. On top of this, make sure you are using the best heroes for PvP and not one more suited to something like Gathering. Check out our list of the Best F2P Heroes and Whiteout Survival Hero Tier List for more help with this.
Getting Close

Ideally, you want to get as close as possible to your targets by using Teleports. This allows you to have much shorter march times thereby reducing the likelihood that your enemy and their allies will be able to plan a defense quickly enough. Unfortunately, this can be tricky to do with Advanced Teleports unable to get your city into enemy Alliance Territory. Therefore, the best targets are those on the edge of their alliance territory, allowing you to get right next to them. Alternatively, you can try your luck with Random Teleporters which have a chance to land you inside enemy territory.
Use March Accelerators
Next up in these 12 Quick Whiteout Survival PvP Tips for Beginners let’s discuss using march accelerators. Of course, as already mentioned, ideally you want to be getting as close as possible to your target using Teleports, but, unfortunately, this is not always possible. This often leaves you many kilometers from the enemy, leaving you to send a long march towards them. This gives the enemy time to react, with their Alliance members very likely to reinforce thereby reducing your chances of victory or at least making it much more costly.
One remedy to this is to use March Accelerator items which reduce the remaining time on your march by up to 50%. Using many of these on one march makes it much harder for your enemy to react regardless of how far away you are. March Accelerator I, which reduces March time by 25%, can be bought for 400 Gems whenever you go to use them, whilst March Accelerator II, which reduces March time by 50%, can be won in events or bought in the shops.
Work With Your Alliance
Solo attacks can be effective if you’re confident of victory, but it’s usually better to work with your Alliance. Calling a rally not only lets you send more Troops, reducing potential losses, but it also allows you to benefit from the buffs of allied Heroes. The top four participating Heroes will contribute their first Expedition Skill, boosting the rally’s overall power. Additionally, by rallying, you avoid appearing vulnerable, as enemies may target your unguarded city while your troops are away when you are on your own.
Scout
Scouting is another essential tactic you need to employ when taking part in Whiteout Survival PvP. This allows you to check what is actually guarding an enemy city thereby avoiding any nasty surprises. This is easily one of the biggest mistakes players make and then wonder why they just suddenly lost all their Troops. It also allows you to see you how many resources are available to be looted from the city which will help you decide if the risk of the attack is actually worth it or not.
Understand Ratios
Often when someone is organising an Alliance Rally you will see them type something like 70 15 15. This is basically the ratio of Troops they want people to join their rally with. The first number is for Infantry, the next for Lancers, and the final one for Marksmen. In this example, you would be expected to send your squad with 70% Infantry, 15% Lancer, and 15% Marksman.
Typically, it is recommended to send a higher ratio of Infantry as these are the front line and will soak up the damage whilst the other Troops stand back and chip away at the enemy. Of course, however, this is not a one-size-fits-all rule. When scouting you will see occasions where the enemy has a certain troop composition where it may be better to send more Lancers or Marksman. This is driven by the relationship that troops have with each other, with each one having a strength and weakness against one of the others as follows:
- Infantry – Strong against Lancers but weak against Marksman.
- Lancer – Strong against Marksman but weak against Infantry.
- Marksman – Strong against Infantry but weak against Lancer.
Hiding Your Troops
Of course, PvP in Whiteout Survival is not all about attack, and defensive tactics should also be utilized as and when required. One of the simplest things you can do is to hide your Troops by sending them on a long march out of your city or to reinforce an Alliance Building that has limited contact with other alliances. This does of course leave your city wide open to attack and therefore you’ll want to make sure you have no exposed resources if doing this. Keep on top of your Storehouse building or start expensive build projects to avoid this risk.
Buff Up
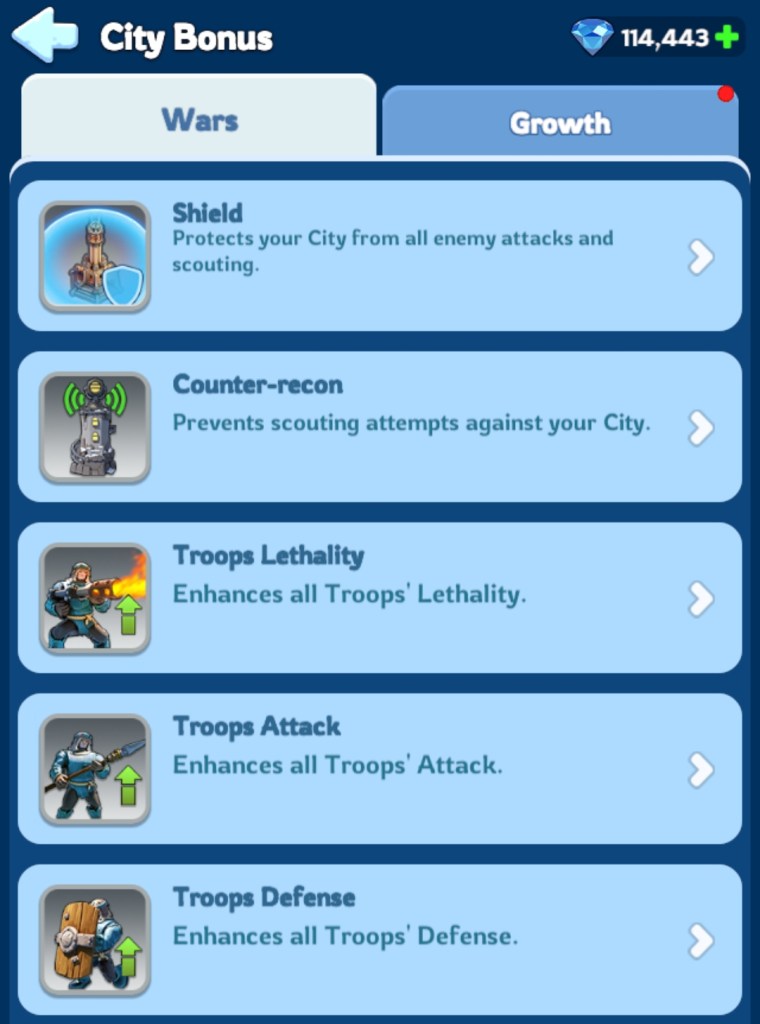
War buffs can make a huge difference to your chances of success when launching an attack against an enemy during PvP. These can be found by selecting the small arrow under your profile picture and include the following that are useful for PvP:
- Counter-recon – prevents enemies from scouting your City for 2, 8, or 24 hours.
- Troops Lethality – increases troop lethality by 10% for 2 hours or 20% for 12 hours.
- Troops Attack – increases troop attack by 10% for 2 hours or 20% for 12 hours.
- Troops Defense – increases troop defense by 10% for 2 hours or 20% for 12 hours.
- Troops Health – increases troop health by 10% for 2 hours or 20% for 12 hours.
- Enemy Attack – lowers enemy troop attack by 10% for 2 hours or 20% for 12 hours.
- Enemy Defense – lowers enemy troop defense by 10% for 2 hours or 20% for 12 hours.
- Deployment Capacity – increases deployment capacity by 10% for 2 hours or 20% for 12 hours.
Each of the above can be bought for Gems but it should be warned that they are very expensive. Alternatively, they can be won as rewards at events or bought in shops. Check out our guide on How to Get Free Gems in Whiteout Survival if you want to take the Gem route.
Watch Your Infirmary
Next up in these Whiteout Survival PvP Tips for Beginners let’s examine the importance of the Infirmary building. This is where your injured Troops will go following an attack who can then be healed. However, the problem comes when your infirmary is full. Instead of injured troops going to the infirmary, they will instead die with no way to get them back. You can increase your Infirmary capacity by upgrading the building level and conducting research in the Research Center. As mentioned, in our Tips for Beginners, you’ll also want to upgrade your low-level troops to make sure they aren’t filling up your capacity. To see your current Infirmary capacity, click on the building and then select details.
Join Rallies with the Right Heroes
Selecting the appropriate Heroes to send when joining rallies is a crucial aspect of PvP. As discussed earlier in this Whiteout Survival PvP Guide, the first four rally joiners contribute their lead Hero’s 1st Expedition Skill to the rally’s overall buffs. However, this is dynamic—if a later joiner has a lead Hero with a higher-level Expedition Skill than one of the initial four, their skill will replace the lower-level one already included. This makes it essential to carefully choose Heroes with impactful skills that enhance attack or defense capabilities.
Sending a Hero with a less effective 1st Expedition Skill can reduce the rally’s overall buff potential, which can negatively impact the rally’s success. For example, skills that boost troop lethality, attack, or defense are generally ideal, while utility skills unrelated to combat are less valuable in PvP rallies.
In Generation 1 States, common recommendations include using Jessie for offensive rallies due to her all-troop attack buff. For defense, Patrick and Sergey are excellent choices, thanks to their health boost and enemy damage reduction skills, respectively. For more recommendations tailored to F2P players, check out our list of the Best Heroes for F2P Players.
Know Your State Rules
Finally, in these Whiteout Survival PvP Tips for Beginners, it is important to mention State rules. Indeed, each State will have agreed to certain rules between the top Alliances that determine what are and are not valid targets. For example, a rule like NAP10 means that no one can attack players in the top 10 alliances. Another common rule is no tile hits which means no one is allowed to attack Troops that are Gathering. These change often and it is important to keep on top of them as if you land on the wrong side of the rules then it is likely you will be kicked from your alliance and hunted down with a kill on sight (KoS) order.
More Whiteout Survival Guides from OCG
- Tips for Beginners
- Best Heroes for F2P Players
- Hero Guide
- Exploration Hero Tier List
- Hero List
- Hall of Chiefs
- Best Formations for Exploration
- Fast Gathering
- Alliances
- Alliance Championship
- Daybreak Island
- Troops
- Fishing Tournament
- Expedition Hero Tier List
- Lucky Wheel
- Alliance Showdown
- Flame and Fangs
- How to Get Gems
- How to Increase Your VIP Level Fast
- PvP Tips for Beginners
- Gina’s Revenge
- Hot to Get and Use Teleports
- How to Win in Arena
- Bear Hunt
- Brothers in Arms
- Frostfire Mine
- Crazy Joe
- Beasts & Polar Terrors
- Troop Cost Calculator
- Treasure Hunter
- King of Icefield
- State of Power
- Tundra Trade Route
- Fortress Battles
Join our Community
If you found these Whiteout Survival PvP Tips for Beginners useful, then join our community below to be kept up to date on any new Whiteout Survival Guides published along with other interesting posts from the website.