When you’re trying to improve your Espers or make a new acquisition more valuable, one of the most important things to improve is the Equipment they have equipped. In this Dislyte Equipment Guide, we will take you through everything you need to know in order to get your hands on some powerful Equipment.
In this Dislyte Equipment Guide, we will cover the basics of Equipment, how to get started picking Equipment for your Espers, how to farm Equipment, and how to improve your Equipment even further. Check out our list of the Best Equipment in Dislyte for details on the Sets that have the most utility in the game.
Table of Contents
What is Dislyte Equipment

Equipment in Dislyte are special items that you can equip to each of your Espers. Once equipped, they grant your Espers additional buffs. There are 6 different types of Equipment that can be given to each Esper, they are as follows:
- Blade
- Armor
- Ring
- Headphones
- Goggles
- Boots
Each one of the above is also part of a specific Equipment Set and equipping a full Set will grant even more buffs. You are able to equip one full 4-piece Set and 1 full 2-piece set. Keep reading below for all the key features of Equipment and how to improve them.
Dislyte Equipment Main Attributes
Each piece of Equipment in the game has one main attribute. This is determined by the type of Equipment it is. Only one of each Equipment type can be equipped. The 6 Equipment types and their corresponding main attribute are summarized below:
| Equipment Type | Attribute |
|---|---|
| Blade | ATK |
| Ring | ATK, DEF, HP, ATK BONUS, DEF BONUS, HP BONUS, C.RATE, or C. DMG |
| Armor | DEF |
| Headphones | ATK, DEF, HP, ATK BONUS, DEF BONUS, HP BONUS, ACC, or RESIST |
| Goggles | HP |
| Boots | ATK, DEF, HP, ATK BONUS, DEF BONUS, HP BONUS, or SPD |
For Equipment with more than one potential main attribute, it is important to try and find one that matches the role your Esper will be playing. For example, SPD on your Boots if it is important for that Esper to get their abilities off quickly.
Dislyte Equipment Secondary Attributes
Each piece of Equipment will have between 0 and 4 Secondary Attributes when you first get it. If the Equipment has less than 4 then it can be leveled in order to get more. If it already has 4 then your existing secondary attributes will receive additional boosts from leveling. Secondary attributes can be any of the following:
- ATK
- ATK BONUS
- HP
- HP BONUS
- C. RATE
- C. DMG
- SPD
- RESIST
- ACC
- DEF
- DEF BONUS
The secondary attribute you receive when leveling a piece of Equipment is completely random. Therefore it is always best to look for Equipment that has 3 or 4 already so you know that investing in improving that Equipment is worth it. Check out the rest of our Dislyte Guides for specific builds on certain Espers which include information on the secondary attributes you want for their Equipment.
Dislyte Equipment Quality
Equipment Quality refers to how many secondary attributes it has when you first get it at level 1. As mentioned above, typically those with more starting secondary attributes are considered better quality. Equipment Quality is summarized below:
| Secondary Attributes | Quality |
|---|---|
| 1 | Good |
| 2 | Elite |
| 3 | Superior |
| 4 | Flawless |
Dislyte Equipment Level
The Level of an Equipment simply refers to its rarity. Generally, the rarer an Equipment is, the better it is. Equipment can range from level 5 to 60. The max level that an Equipment can be Enhanced to, and the maximum number of Secondary Attributes it can start with, is also determined by its overall Equipment Level. This is summarized in the table below:
| Equipment Level | Secondary Attributes | Enhancement Level Cap |
|---|---|---|
| 5 | 0 | 0 |
| 10 | 0 – 1 | 0 |
| 15 | 0 – 2 | 3 |
| 20 | 0 – 3 | 6 |
| 25 | 1 – 3 | 9 |
| 30 | 1 – 4 | 12 |
| 40 | 1 – 4 | 12 |
| 50 | 2 – 4 | 15 |
| 60 | 2 – 4 | 15 |
Leveling Dislyte Equipment
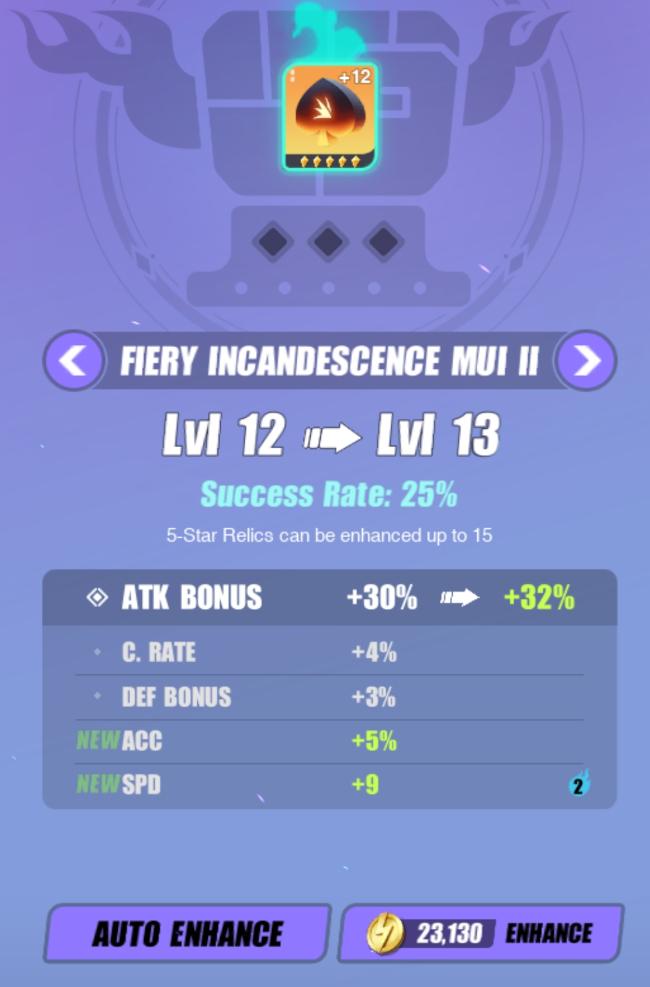
All Equipment starts at Enhancement Level 1 and can be leveled up to a maximum of 15 if they are level 50 or better. It costs gold to complete this and can get very expensive as the chance of success declines as the level increases. As such, you should only level them up to their maximum if they’re the best possible Equipment for that slot.
Each time you level a piece of Equipment, its main attribute will increase. In addition, at certain level milestones, you will have a secondary attribute added. Once the maximum secondary attributes for that Equipment have been met, then a random secondary attribute will instead receive a boost. A random secondary attribute gets boosted/unlocked at levels 3, 6, 9, 12, and 15.
If you do decide to level them up, the benefit can be huge. The higher the Level, the higher the boost the Equipment will receive for its stats each time it is leveled.
Boosting Dislyte Equipment
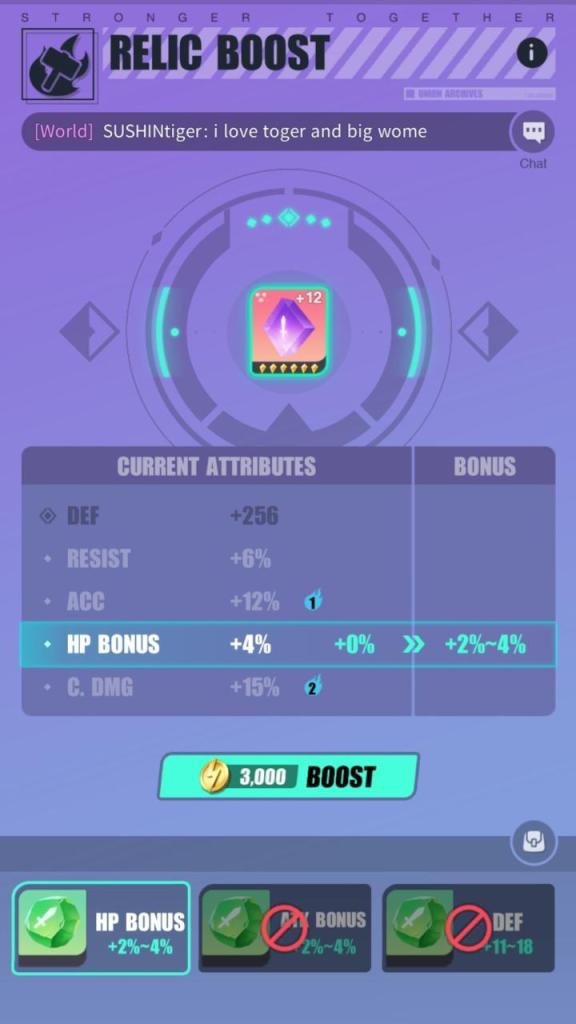
Once you’ve found a great Equipment piece that you want to improve more, you can then boost its secondary attributes further by using Boost Stones. These are acquired through beating the Desolate Lands bosses, which reward you with Boost Stones that are tied to a specific Equipment Set and secondary attribute.
Once you have a great piece of Equipment you want to improve, and the corresponding Boost stones, then you are ready to get boosting. Simply select the Boost Stone you wish to use from the menu and it will improve the corresponding secondary attribute to a value within the given range on the Boost Stone. Blue Boost Stones will improve your secondary attributes more than Green Boost Stones.
It should be noted that each secondary attribute can only be boosted once. However, if you are not happy with the boosted value then you can attempt the process again if you have another Boost Stone available. As such, it is not recommended to waste Boost Stones on poor Equipment as you will likely need many to perfect your best ones.
Resetting Dislyte Equipment
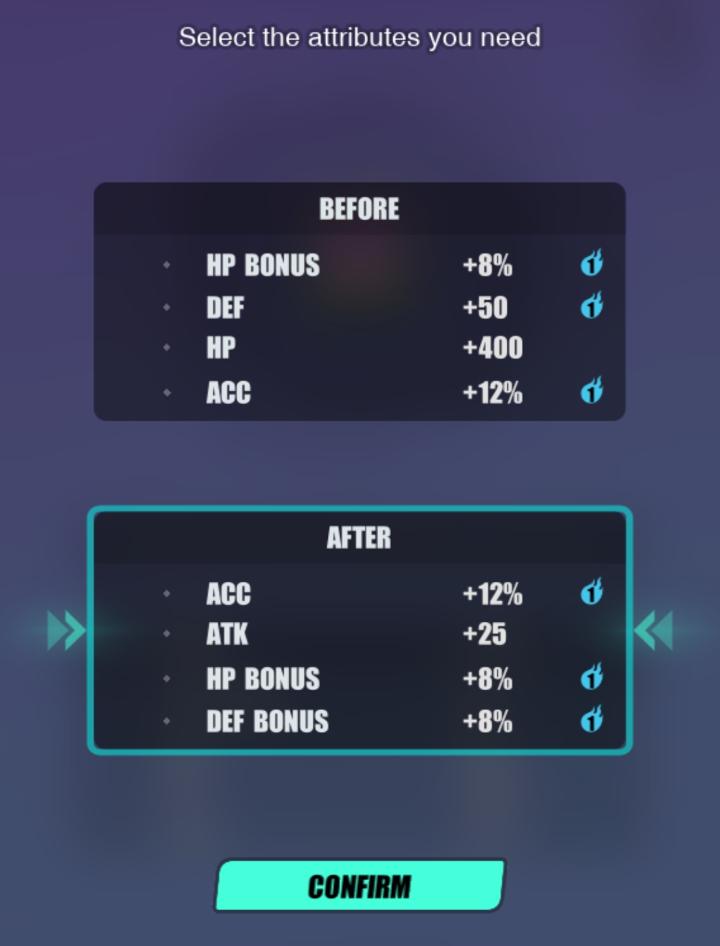
Another item relevant to Equipment that can be obtained in Dislyte is Reset Stones. They are relatively rare but if you play regularly you should start to accumulate a few from in-game events such as the R-Pass.
To use, the Equipment piece must already have 4 secondary attributes. When the Reset Stone is applied to the Equipment, it will generate 4 completely random new secondary attributes for the Equipment. You are then able to choose if you would like to keep the new ones or the old ones. This can be very useful if you have messed up in your build for an Equipment piece!
Dislyte Equipment Sets

There are many Equipment Sets, all of which can be obtained through different means. Owning a full Equipment Set is highly desirable as it will give you an additional Equipment Set Bonus. Each Esper can equip one 4-piece Equipment Set and one 2-Piece Equipment Set.
A full list of Equipment Sets available in the game can be seen below along with details on their effect and where they can be useful.
| Equipment Set | Description |
|---|---|
| War | 30% increase in ATK. Not specialized for any game mode but is particularly effective on any Fighter Espers. |
| Wind | 25% increase in SPD. Particularly useful for game modes where the fight is usually finished in a few turns by letting you get the upper hand, such as Point War. |
| Astralis | 25% chance of an extra turn when the Esper takes action. Can only be triggered once and does not affect ability cooldowns. |
| Grove | 25% increase in HP. Useful for Espers with lower than average HP, or who tend to fall often. |
| Stonevein | 25% increase in DEF. Useful for Defender Espers whose defense is already pretty high, or those who can use Taunt. |
| Recurve | 25% increase in ACC. Makes your Espers miss less often. |
| Nether | 35% Lifesteal. Useful for Fighter Espers who are able to recover a lot due to their high damage. |
| Panacea | Increase Healing Efficacy by 30%. Helpful for Support Espers with healing capabilities like Chang Pu and Asenath. |
| Ocean | 35% chance of reducing all ability cooldowns by 1 at the start of an Esper’s turn. Useful for game modes with longer battles or Espers with extremely long cooldowns, such as Ollie. |
| Avatara | 25% chance of Counterattack upon taking damage. Useful for Espers who can take a lot of damage, such as Defenders or Fighters with self-healing abilities. |
| Aegis | Grant a Shield equal to 15% of their maximum HP to all allies. Important to always have this set on someone in your team in particular an Esper with high HP. |
| Fiery | 20% increase in C. RATE. Useful for Fighters with attacks that hit several times in a row. |
| Tyranny | 20% chance of stunning the target. Particularly useful for game modes like Point War to stop the opponent from taking a turn. |
| Frost | 25% chance of freezing the target. Particularly useful for game modes like Point War to stop the opponent from taking a turn. |
| Thunder | Increase C. DMG by 50%. Grants an extra 30% when attacking Bosses. Useful for Espers who can increase their C. RATE. |
| Enchanted | 30% chance of extending any Poison or Bleed debuffs by a turn. Useful for Espers whose damage mostly comes from these debuffs, such as Anesidora. |
| Immensus | 25% increase to RESIST. Useful if you know an Esper you’re using has low resistance and will need it to be higher for this fight. |
| Light | Espers begin the fight with Immunity that lasts for one turn. All allies gain 10% AP when the effect expires. Useful in fighting enemies like Apep who rely on inflicting debuffs. |
| Relief | When teammates cast basic Abilities, the wearer has a 25% chance of performing an Assist Attack on targets with their basic Ability (only triggers once per turn when there are multiple wearers). |
| Harmony | Ally damage +10% for 2 turns after casting Ability 3 (unstackable). |
| Calamity | Damage against targets with a debuff +20%. For each additional debuff on the target, damage +3%, with a maximum additional increase of 15%. |
| Brawler | Basic Ability damage +15%. Consecutively casting a basic Ability further increases its damage by 10%. |
| Shield | Damage taken -12%. After taking damage, if the attacker is non-Shimmer and not at an elemental advantage, damage taken is further reduced by 6% for 1 turn. |
| Holdfast | Increases allies’ Base DEF by 12% of the wearer’s RESIST (effect stacks when there are multiple wearers). |
How to Get Dislyte Equipment
Equipment farming is the process of playing certain game modes repeatedly to try and get the specific Equipment that you want. This can be done in most game modes however by far the best place to get Equipment is in the Ritual Miracle.
Equipment Available in the Ritual Miracle
There are three Bosses in the Ritual Miracle, all tied to different Equipment Sets. The higher the level of the Boss you take on, the better the quality of the Equipment you can win. The Equipment available by beating each Boss in the Ritual Miracle is shown in the table below:
| Boss | Equipment Sets |
|---|---|
| Kronos | War Wind Astralis Grove Stonevein Recurve |
| Apep | Nether Panacea Ocean Avatara Aegis Fiery |
| Fafnir | Tyranny Frost Thunder Enchanted Immensus Light |
| Andras | Relief Harmony Calamity Brawler Shield Holdfast |
How to Beat the Ritual Miracle

Here we summarize some specific battle strategies you can use to get a rough idea of what it will take to progress through the levels in order to farm better Equipment. However, you can also check out our full Dislyte Ritual Miracle Guide for more information and strategy for this game mode.
- Kronos – Inferno boss who deals the most damage to targets with low health. This means the best way to challenge it is to ensure your team is fully healed and supported.
- Apep – Wind boss who is capable of inflicting stacking Poison debuffs, along with dealing the most damage to poisoned Espers. As such, it’s vital to make sure you can use Immunity where possible and dispel any harmful effects. It can also heal itself.
- Fafnir – Flow boss that can shield itself and hide from damage. In addition, the Tablets on either side of it buff it after death. As such, it’s incredibly important to use single-attack abilities where you can! This is considered the hardest boss of the three, so be careful.
- Andras – Shimmer boss that is more effective when not debuffed, decreases the effectiveness of Heals, and takes reduced C. DMG. Using AoE Poison Espers and those that can distribute Shields is a good counter to Andras.
Equipment Fusion
Another good method for picking up Equipment is via Equipment Fusion. This is found in the War Room and allows you to use special materials to create any specific Equipment you are after. Depending on the material you have available you can create Level 40, 50, or 60 Equipment. This is summarized in the table below:
| Equipment Level | Material |
|---|---|
| 40 | x40 Equipment Dust |
| 50 | x50 Equipment Crystal |
| 60 | x60 Equipment Essence |
If you are short on some of the higher-level materials, you can use Power Fusion to create them in exchange for the 3 of the Equipment Materials from the level below. In addition, these materials can be obtained from the Cube Miracle and other regular events. It is recommended to only use your materials to fuse Level 60 Equipment however you will need to have beaten the corresponding Boss in the Ritual Miracle at difficulty 12 to do this.
Picking Dislyte Equipment for your Esper
When you go to equip Equipment onto an Esper, it will inform you of the two most popular sets used for that Esper. This can be a good guide to get you started with some options.
However, if that is not enough you can also check the Strategy tab on an Esper’s profile for a little more information and even some more personal opinions from other players. Alternatively, you can check out our Dislyte Guides for detailed builds for specific Espers.
Below is what the Strategy Tab recommends for Ollie! While the most popular set isn’t necessarily the best one, it’s likely that other players have done their research on what works best, so it’s a good guide!

Going Forward with your Dislyte Equipment
Hopefully, this Dislyte Equipment Guide will help you to weed out the good Equipment you’ve earned from the bad! This information should be enough for you to develop some pretty solid builds. If you need any more help, get in touch with us and we’ll do our best to get back to you! Have fun building your Espers!
More Dislyte Guides from OCG
Join our Community
If you found this Dislyte Equipment Guide useful then join our community below to keep up to date on any new Dislyte Guides posted.